Setting Up Exception Codes
Contact centers operate on a 24x7 basis, and are susceptible to exceptions created when employees are absent. WFO Live records the exceptions to the schedules as they become known. It tracks the performance of the contact center throughout the day so that you can make adjustments to maintain efficiency and service levels for different workgroups.
Exception codes are used in the daily and weekly staffing of shifts to exclude employees from getting hours. Exception codes for paid and non-paid days are 1-3 character, alphanumeric codes representing a non-scheduled day. You can customize these codes to meet your requirements.
What do you want to do?
Tasks in this Topic Include:
Related Tasks:
- Create Sites
- Setting Up Hours of Operation
- Create Skills
- Applying Service Levels
- Creating Skill Teams
- Applying Shrinkage Parameters
- Applying Non-Call Parameters
- Import Work History
- Exception Calendar and Meeting Planner
Access Exceptions
- Select Setup > Workgroups.
- Select the workgroup you want to work with from the Workgroup drop-down menu.
- Select the Exceptions tab.
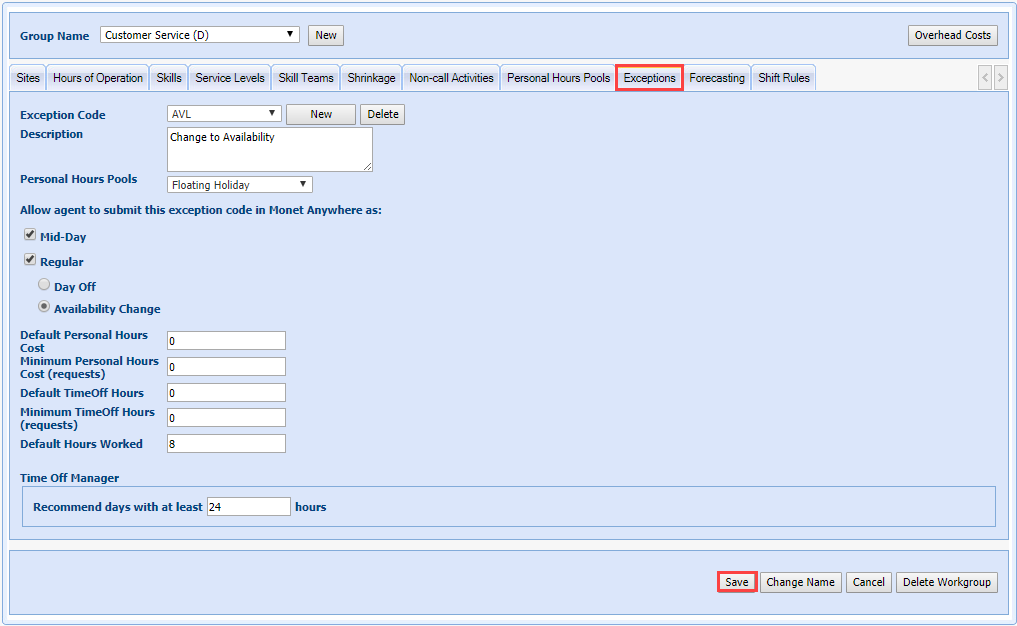
Exceptions Fields
| Exceptions Fields | Description |
|---|---|
|
Exception Code |
A 3-digit, alphanumeric code used to uniquely identify this exception type. |
|
Description |
The field used to identify the usage for this exception type. Note: This field is visible to agents for all exceptions that agents are allowed to request in the Agent Portal. |
|
Personal Hours Pools |
This field links this exception type to a Personal Hours Pool. Selecting a Personal Hours Pool will open the Default Personal Hours Cost and Minimum Personal Hours Cost fields on this screen. It will open the Personal Hours Cost field on all exceptions created for this exception type. |
|
Allow agent
to submit this exception code in Anywhere as: Mid-Day Regular |
These check boxes will allow agents to request this exception in the Agent Portal. Leave both boxes unchecked if this code should not be requested by agents. Regular allows the agent to submit the request for a day off, or availability change. When the Regular check box is selected, this will limit the fields the agent can request. Min hours, Max hours, Earliest Start, Latest Start, Preferred Start, and Latest End are automatically filled in with zeros (0) in the request. |
|
Day Off |
This means that any Regular exception request entered by an agent will automatically constitute a day off. |
|
Availability Change |
Selecting this radio button will open all regular exception fields to the agent when requesting a regular exception of this types. This means the agent is able to request a change to the times they are available to work, in addition to a full day off. |
|
*Default Personal Hours Cost |
This field will automatically populate the Personal Hours Cost field for all exceptions of this type with this number. |
|
Minimum Personal Hours Cost |
This field will set a minimum value for the Personal Hours Cost field for all exceptions of this type. This will prevent an exception from assigning a Personal Hours Cost below the minimum setting here. |
|
*Default TimeOff Hours |
This field will automatically populate the TimeOff Hours field for all exceptions of this type with this number. |
|
Minimum TimeOff Hours (requests) |
This field will set a minimum value for the TimeOff Hours field for all exceptions of this type. This will prevent an exception from assigning TimeOff Hours used below the minimum setting here. |
|
Default Hours Worked |
This field will automatically populate the Hours Worked field for all Regular exceptions of this type with this number. |
|
Time Off Manager
Recommend days with at least _ hours |
This setting works with Time Off Manager Rules in the Exception Calender to recommend potential days off to the agent in their agent portal. This field may already be populated if other Exception Codes were created previously. The Time Off Manager setting is an independent setting and does not apply to any specific exception code. Recommended days with at least _ hours is the global setting that is used to determine whether a day should be recommended or not when judging how many TimeOff Hours are being requested versus how many are already used. |
Create Exception Codes
- Select New from the Exception Code drop-down.
- Enter the Exception Code.
- Enter a Description of the code.
- Select a Personal Hours Pools choice from the drop-down.
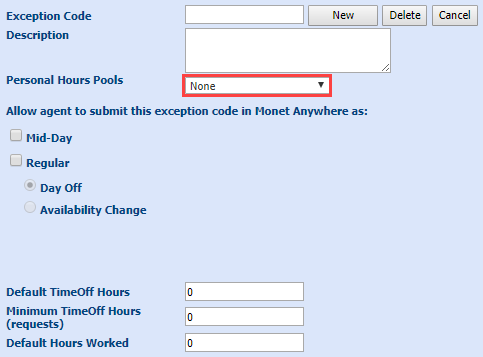
Steps 5 and 6 will allow agents to request this exception in the Agent Portal. Leave both boxes unchecked if this code should not be requested by agents.
When the Regular check box is selected, this will limit the fields the agent can request. Min hours, Max hours, Earliest Start, Latest Start, Preferred Start, and Latest End are automatically filled in with zeros (0) in the request.
- Select one of the following:
- Select Regular to allow agents to submit the exception code in Anywhere.
- Select Mid-Day to allow agents to submit the exception code in Anywhere.
- Select one of the following:
- Select Day Off.
- Select Availability Change.
- Select neither if this exception should NOT be requested by an agent in Anywhere.
- If a Personal
Hours Pool has been selected:
- Enter the Default Personal Hours Cost.
- Enter the Minimum Personal Hours Cost.
- Enter the Default TimeOff Hours.
- Enter the Minimum TimeOff Hours (requests).
- Enter the Default Hours Worked.
- Enter the Recommend days with at least....
- Select Save.
Modify Exception Code
- Select the Exception Code to modify in the drop-down menu.
- Make the necessary changes in the Description text box.
- Edit the Personal Hours Pools as desired.
- Edit the settings for Mid-Day, Regular, Day Off, and Availability as desired.
- Edit the Default Personal Hours Cost, Minimum Personal Hours Cost, Default TimeOff Hours, Minimum TimeOff Hours (requests),and Default Hours Worked values as desired.
- Select Save.
If the Personal Hours Pool has been edited, a confirmation message is displayed:

- Select Yes to accept the edits, or No to delete all edits.
Delete an Exception Code
- Select the code that you want to delete from the Exception Code drop-down menu.
- Select Delete. A confirmation window displays.
- Select one of the following:
- Select No to cancel the process.
- Select Yes to delete the selected code.